


![SoftPro™ Chlorine+ Carbon Whole House Water Filter to Remove PFAS, Chlorine, Chloramine & Pesticides [City Water Filters Series]](http://softprowatersystems.com/cdn/shop/files/SoftPro_Whole_House_Carbon_Filter_with_Spin_Down_Water_Filter.webp?v=1783547361&width=140)


 855-683-8488


Iron Filter Installation in a Mobile Home Utility Area: Practical Guide

Installing an iron filter in your mobile home's utility area starts with choosing a dry, level spot near your main water line and a grounded outlet. We'll assemble the tank with birm media, connect a bypass valve with Teflon tape, add a drain line with an air gap, and plug it in. Regular backwashing every few days keeps iron levels low. Stick with us, and we'll walk you through every step in detail.
Key Takeaways
- Test water first to determine iron levels, then gather supplies including a 5-gallon bucket, polyfill media, and basic plumbing materials.
- Choose a dry, ventilated utility area with a level surface, 2 feet clearance, and proximity to the main water supply line.
- Assemble the filter by positioning the upper deflector, adding birm media, lubricating the control valve O-ring, and verifying directional arrows.
- Connect plumbing using Teflon tape, install a bypass valve, attach drain tubing with a 3-inch air gap, then restore water pressure carefully.
- Maintain the system by backwashing every 3-5 days, replacing polyfill media every 3-6 months, and keeping a detailed maintenance log.
What to Buy Before Installing a Mobile Home Iron Filter

Before we plunge into the installation process, let's make sure we've got everything we need. Start by grabbing a 5-gallon bucket, polyfill filtration media, and basic plumbing supplies. We'd also recommend picking up optional sand or activated charcoal if we want enhanced filtration performance.
Next, we'll need to test our water to determine iron levels, which directly influences our filter choice. Depending on those results, we're looking at catalytic carbon, Birm, or greensand filter systems — each handles different iron concentrations.
Don't forget to calculate our household's daily water consumption so we select a filter with adequate flow rate capacity. Finally, gather tools like a drill and bit set before we begin assembly. Proper preparation now prevents frustrating mid-installation trips to the hardware store.
Pick the Right Spot for Your Iron Filter in a Mobile Home
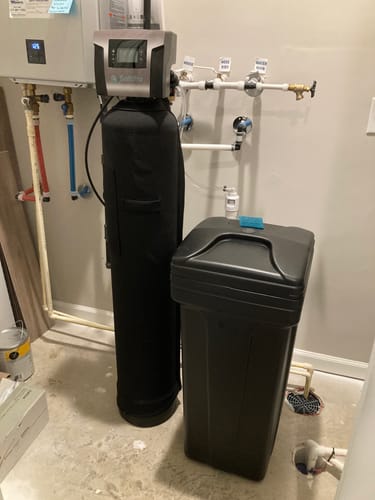
Now that we've got our supplies ready, choosing the right spot for the iron filter sets the foundation for a smooth installation. We recommend the utility room or basement — dry, well-ventilated spaces that shield the unit from moisture and temperature swings that shorten its lifespan.
Place the filter on a level surface with at least 2 feet of clearance on all sides. That breathing room pays off during backwashing, media replacement, and routine inspections. We also need the unit close to the main water supply line and within 10 feet of a grounded 110V outlet for the control valve.
Avoid flood-prone or high-humidity zones entirely — they'll quietly degrade performance over time. Smart placement now means fewer headaches later.
Assemble and Install Your Iron Filter Tank and Media
With our spot locked in, it's time to build the system that'll actually pull iron out of your water. Every component has a purpose, and getting the sequence right determines whether your filter performs for years or fails within months.
| Component | Key Action |
|---|---|
| Upper Deflector | Slide 4" down riser, domed side up |
| Birm + Gravel | Add birm first, then gravel layer on top |
| Control Valve | Lubricate O-ring, verify directional arrows |
Position your resin tank on dry, level ground—never where freezing temps can hit it. After loading your birm media, that gravel layer on top isn't optional; it actively enhances filtration. When attaching the control valve, match those inlet/outlet arrows precisely. Reversed connections mean contaminated water flows straight through untreated.
Connect the Water Line, Drain, and Electrical Supply
Once the tank's assembled and seated, we're ready to tie it into the home's plumbing and power.
First, identify the main water line and carefully mark your cutting points — clean cuts protect the pipe integrity and save headaches later. Install the bypass valve next, wrapping every threaded connection with Teflon tape for a truly watertight seal.
For drainage, connect the 1/2-inch drain tubing to the drain barb, lock it down with a hose clamp, and maintain that critical 3-inch air gap — it prevents backflow contamination.
Now plug the system in and set the time to 12:01 PM, which activates the control valve's programming mode. Finally, slowly restore water pressure and watch every joint closely as flow resumes. Catch leaks now, not later.
Backwash, Replace Media, and Monitor Iron Levels on Schedule
Keeping the system running clean takes just a little routine attention. We've found that staying consistent with a few simple habits protects our investment and keeps iron out of our water long-term.
A little routine attention goes a long way toward protecting your investment and keeping iron out of your water.
Here's our core maintenance rhythm:
- Backwash every 3–5 days to flush accumulated iron and contaminants from the filter bed
- Replace polyfill media every 3–6 months before performance drops noticeably
- Watch for reddish-brown discoloration in the media—it tells us the filter's actively working
- Test water periodically to confirm iron levels stay within acceptable limits
We also keep a maintenance log tracking every backwash cycle, media swap, and water test. That log becomes our early-warning system, helping us spot patterns before small issues become costly problems.
Frequently Asked Questions
How to Install an Iron Filter?
We'll install your iron filter at the main water entry, using a 5-gallon bucket layered with polyfill, sand, and activated charcoal. Seal connections with Teflon tape, follow valve arrows, and replace polyfill every 3-6 months.
Should an Iron Filter Be Installed Before or After a Water Softener?
We recommend installing your iron filter prior to your water softener. This protects the softener's resin from iron fouling, extends its lifespan, and guarantees both systems perform at peak efficiency for your home's water quality.
How Much Does It Cost to Have an Iron Filter Installed?
We're looking at $500 to $1,500 total, combining the unit ($200-$800) and professional installation ($300-$800). Remember, ongoing maintenance adds $100-$300 annually, so let's budget accordingly for long-term performance.
How Big of an Iron Filter Do I Need?
The size you'll need depends on your iron levels and daily water use. For under 3 ppm and 500 gallons daily, we recommend 1 cubic foot. Higher levels or usage requires stepping up to 1.5 or 2 cubic feet.


